Experience turning a color e-ink paper display into a digital picture frame…and learning rust along the way.
This is not something i expected myself to be writing about, but i think the hurdles, learning and overall experience doing this project are worth a blog post.
A close friend of mine had started tinkering with a color e-ink display a while ago, we talked about it and she proposed me to buy a bigger version of the display. Since we had planned to meet up it was a good idea for a time sink anyway, so i ordered a 7.3inch ACeP 7-Color E-Paper E-Ink Display Module, a starter electrics bundle and a debug probe for the Raspberry Pico W, totally unaware of what rabbithole i was signing up to. I should mention that my friend provided the PI pico at first.
What’s a E-Ink paper display anyway?⌗
It’s a display but rather then using lid pixels it uses pigments which physically alter the display creating the image. This has the advantage that the image is clearer and does not have the issue of edges you can have with normal pixel displays. Further if you cut the power to the display, the image stays, theres no blackout like on classsical displays. One of the disadvantages is that a update of the frame can take a long time, multiple seconds. Also that most E-Ink display’s do not support a lot of colours.
What’s about the Pico⌗
The Pico is a super tiny computer. It does not run a classical operating system. It only runs your code, but still has multicore capabilities, has a wifi chip(the W version) and has a usb port you can use to flash the 2mb ROM of the Pico, a clock chip and so on. But Of course besides the extremely low power consumption, the appeal is that it is designed to interact with external hardware like LEDs, sensors, displays and more over PIO(Programmable Input/Output).
For that interaction it has a range of connectors, Pins which support different protocols, by that i mean that they do not only support setting or reading or removing a voltage, but they also support more complex protocols for data transfer, analog reading and much more.
Getting started⌗
When starting i had no experience working with the pico or those e-ink displays. My idea was simply put to have this display rotate through some of my images and display them like a digital picture frame.
After getting the display the first thing was not to use it actually but to get familiar with the pico by just playing around with some LEDs. That went pretty well, the pi has a bunch of input and output pins you can control by simply setting them high or low, or in other cases use more advanced protocols for data transfers like i2c, spi and so on.
This might seam like a lot but once you get the idea of it, the usage actually becomes pretty simple and intuitive.
Getting the Waveshare display to work⌗
The display we use is the 7.3inch ACeP 7-Color E-Paper E-Ink Display Module, it supports 7 colors, the data transfer is done via the SPI protocol.
The first hurdles is getting the pins connected, the display has 8 pins, not all of them can be connected to any slot of the Pico, because for example not all pins of the Pico support the SPI protocol.
After the pins are connected, getting the default code setup is the next step. This is not really complicated per se. The issue is that you need specific toolchain setups and libraries for the Pico. After all you are running software directly on the chip, theres no operating system inbetween. For this after some time i decided to use embassy-rs.
There are dedicated libraries for those displays but i decided against using it because at time of starting the project the implementation for the specific display was just merged into the main branch but even then it did not seam to work and besides that the code needed for the display is not very complicated anyways. Although i should mention that the reason the display was not working might have been another one.
Issues getting the Display to Power on⌗
I would argue the biggest issue while getting the display to work is that Waveshare does provide little to no effective documentation regarding the hardware setup. When starting with this, it could have eliminated a lot of uncertainity while trying to get it to work. This comes from the fact that besides the busy pin theres no feedback from the display, the pin can be low showing the display is busy and high indicating it’s not busy, but thats all.
One of the biggest issues i encountered during that, was that the display not doing anything and the driver board of the display heating up a lot. That came from the fact, that the ribbon cable from the display’s driver board and the display has a connector which can be hard to understand. Tne reason is that the connector has a closing mechanism which is not intuitive to use, if you do not know the mechanism for opening and closing it, you might aswell think it has no closing function at all. Besides that you need a lot of force equaly distribution to open it.
So the thing is: even after understanding this, the display still did not update. Making me believe it was broken, but the next day it started working. That was very confusing and to this day i am not sure why it just started working randomly.
Another issue was the confusion about the voltage the display needs, 3.3V or 5V? The datasheet from Waveshare does not make that obvious. It states it supports both. I can confirm it does work with 3.3V, connecting the VCC line to a 3.3V power connector on the pico.
Display something⌗
As mentioned earlier i decided to not use a library but to implement the driver code myself. Doing that requires a SPI interface, a bunch of functions which send hardcoded set of data over spi for control like: init, turn on, update, turn off. Another function to reset the display(this uses a dedicated pin) and the busy pin for knowing if the display is busy. The resource i used to write that code is the waveshare c driver, porting this to rust was not very difficult using the spi example for embassy rs.
The issue there was that the code i wrote was not very maintainable. Because i had not used rust for a while and this is pretty low level code, there was a lot of duplication of code, non optimal patterns and bad practices.
Now the abstract code to display something is:
  display_driver.send_init();
  display_driver.send_command(0x10);
  for _ in 0..WIDTH * HEIGHT / 2 {
    display_driver.send_data(&[0x11]);
  }
  display_driver.turn_on();
  display_driver.refresh();
  display_driver.wait_busy();
  display_driver.turn_off();
  display_driver.deep_sleep();
After the init and spi command send_command, the reason that we only send half the pixels in bytes is that the 7 colors the display supports means we can fit two colors in one byte. 0x11 means we are sending the white color for both the pixels in the byte, send_data takes a byte array to send over spi.
The actual update happens during the refresh call, this call takes ~30 seconds.
What the difference between turn_off() and deep_sleep() is, im not entirely sure about. But deep_sleep does not release the busy pin ever. Meaning it is something final(probably).
Display a Picture on the frame⌗
The biggest part of displaying a picture on the eink display is reducing the colors to the 7 by using dithering, which means putting two of the 7 colors next to each other in a way which from further away seams like a different color.
To archive that we use the convert tool from ImageMagick.
We can give it a color palette in form of a BMP and a input file in order to dither the image.
$ convert /input/image.jpg -alpha off -dither FloydSteinberg -remap /assets/palette_file.bmp /output/image.jpg

Left is before and right is after dithering, as you can see while the right version is much darker, it does not loose a lot of detail even though it is only made of 7 colours.
Another thing is that the waveshare display is 800x480 and so we need to scale the image to it:
$ convert /input/image.jpg -alpha off -resize 800x480^ -gravity Center -extend 800x480 +depth -dither FloydSteinberg -remap /assets/palette_file.bmp /output/image.jpg
After that we can send the file to the display, even though of course we need to send the raw pixel data, not the entire BMP file.
This is very easy, the data offset is simply reading a uint32_t at offset 0x0A.
Sending the image to the Display can be another thing though.
Using the TCP Stack to receive a image⌗
We first need to setup the TCP stack, here is a reduced version of loading the wifi chip firmware, joining the network and setting up the api stack:
let pwr = Output::new(p.PIN_23, Level::Low);
let cs = Output::new(p.PIN_25, Level::High);
let mut pio = Pio::new(p.PIO0, Irqs);
let spi = PioSpi::new(&mut pio.common, pio.sm0, pio.irq0,
    cs, p.PIN_24, p.PIN_29, p.DMA_CH0);

static STATE: StaticCell<cyw43::State> = StaticCell::new();
let state = STATE.init(cyw43::State::new());
let (net_device, mut control, runner) = cyw43::new(state, pwr, spi, FW).await;

// ...

let stack = &*STACK.init(Stack::new(
  net_device,
  config,
  RESOURCES.init(StackResources::<2>::new()),
  seed,
));

unwrap!(spawner.spawn(net_task(stack)));
See the complete example here github.com/embassy-rs.
After this we can use a pretty ordinary Network API to talk with other devices over TCP:
let mut rx_buffer = [0; 4096];
let mut tx_buffer = [0; 4096];

let mut socket = embassy_net::tcp::TcpSocket::new(stack,
  &mut rx_buffer, &mut tx_buffer);
socket.set_timeout(Some(Duration::from_secs(10)));
info!("Connecting...");
let host_addr = embassy_net::Ipv4Address::from_str(IP).unwrap();
if let Err(e) = socket.connect((host_addr, PORT)).await {
  warn!("connect error: {:?}", e);
  return;
}
// reading:
let result = socket.read(&mut buffer);
// write
let result = socket.write_all(&bytes);
This is actually pretty cool, it is a very c like api, so wrapping my head around it was not hard.
A small catch: With the amount the embassy rs runtime takes + the wifi stack, we fill up the RAM of the pico very fast. Making it unable to have a entire image (800 * 480 /2) bytes available on top.
But we can work around that, by directly sending the data through to the waveshare display, because the stack is not slow, so speed is not a issue. Since the display itself only starts actually updating the displayed content on the refresh command, it is inherently able to handle the entire data size.
So basically we need to just connect to our remote source and then transfer the data directly to the display driver:
display_driver.send_init();
display_driver.send_command(0x10);
let mut socket = embassy_net::tcp::TcpSocket::new(stack, &mut rx_buffer, &mut tx_buffer);
loop {
  let mut data_buffer = [0; 4096];
  let read = socket.read(&mut data_buffer).unwrap();
  if read == 0 {
    break;
  }
  display_driver.send_data(&data_buffer[..read]);
}
socket.close();
display_driver.turn_on();
display_driver.refresh(); // display updates here
//...
This does give you a working example of how to send data, even though of course that code snippet is simplified.
Putting it all together⌗
At this point you probably have a good idea of how to drive such a display.
I ended up writing a Node.js server using its tcp api, which first of all has a folder with jpeg files of a lot of my favorite images, which acts as a source. Since this is all in LAN theres no authentication.
The node.js app waits for connections to the tcp server, first reads a few bytes from the connection which are controlled by physical buttons(or a touch display) on the pico for going back, forward or get a random image.
It then gets that image out of that folder, invokes the convert command with the output to stdout(simply by giving this as the last argument rather then a output path: BMP3:-) using Node’s child_process api and just sending the BMP data to the connection, updating the image.
As a final step i put the image display in a actual image frame to act like a digital image frame displaying my favorite images.
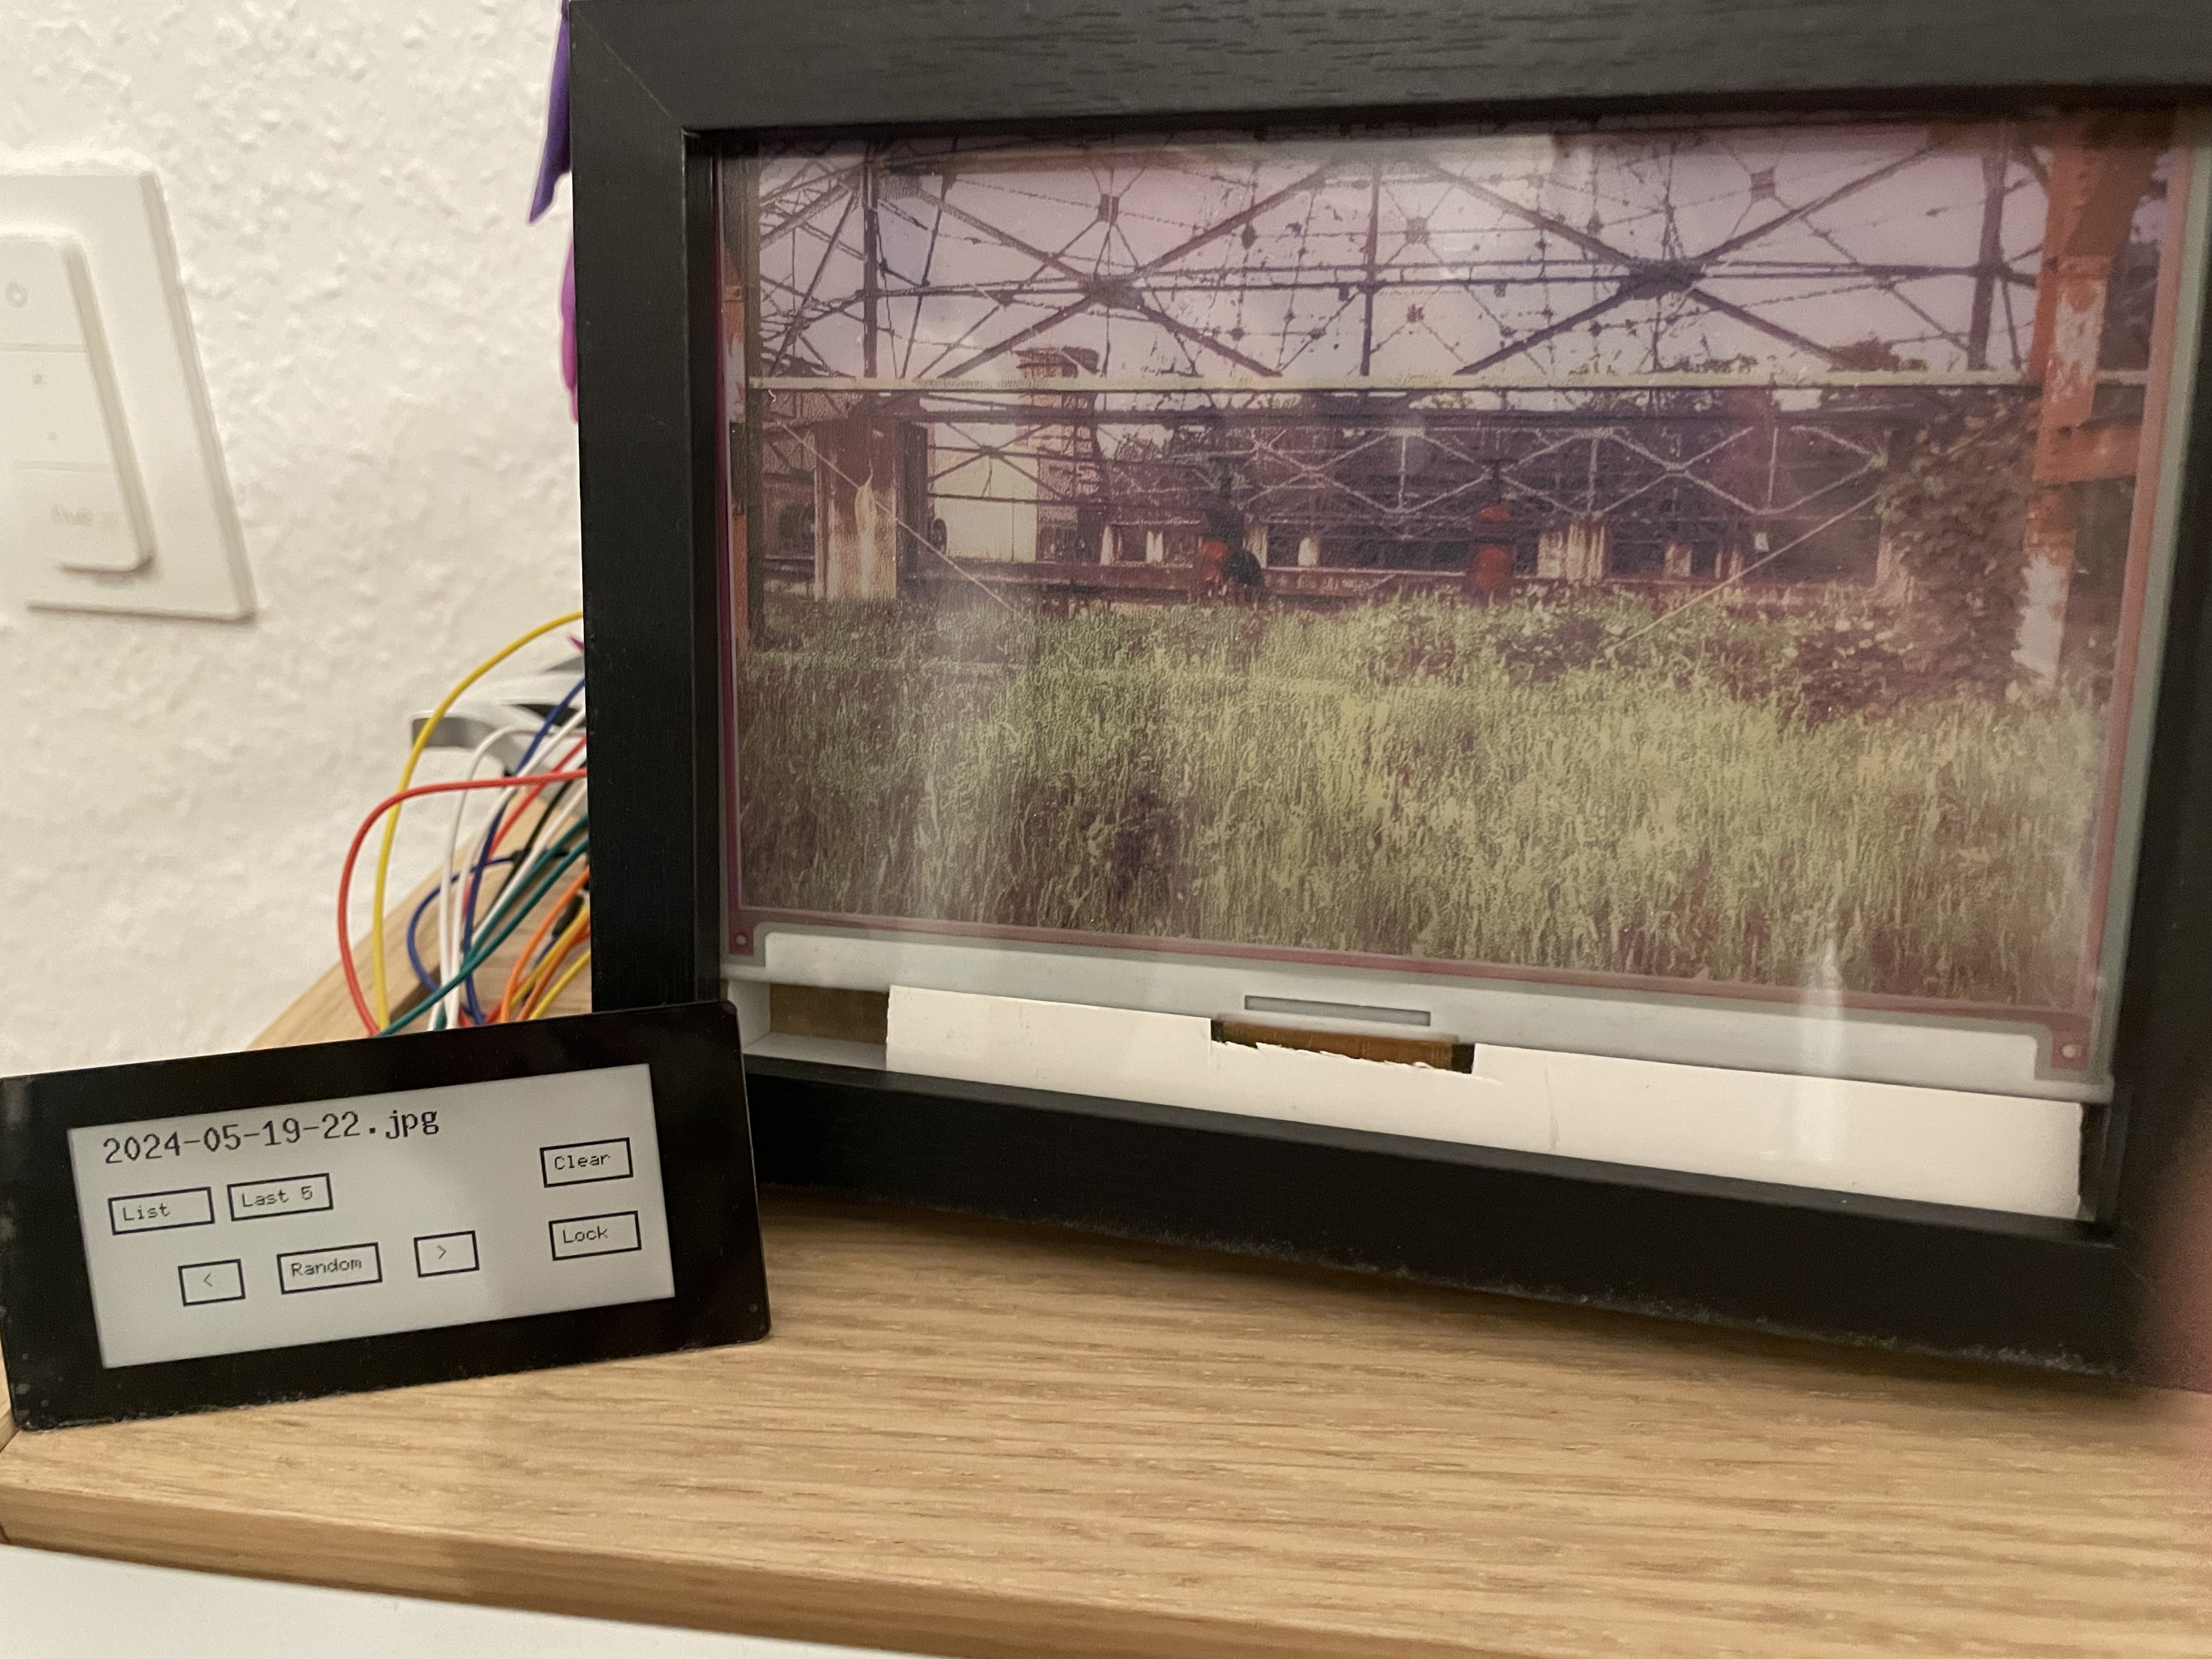
A small detour on the e-ink touch display⌗
The touch display you can see on the left is pretty simple, it is a 2.9" black/white touch eink display it works basically like the big one, with the only noticable differences being that it for one only has black or white, reducing the data amount a lot to a bit per pixel and secondly it has a touch surface, which i use to control the signals send to the tcp server in order to get different results.
It uses embedded_graphics which has static bitmap fonts and functions to render shapes and text, this is done on the pico directly.
Final thoughts⌗
Even though this project is done for a good while it is one of my favorites, i am not per se a hardware guy. My big projects are gui applications and a programming language i contribute to.
This project has tought me a lot how to connect easy hardware components to each other, i have learned about SPI, i2c and other protocols. But most importantly i have had a lot of fun building and coding it, further the projects result gave me a useful way to display some of the images i took in a nice way.
On Rust⌗
The reality is that i am not sold on rust, rust is a very good language. It does give you a lot of safety and modern features amongst the memory safety given by the compiler’s borrow checker.
But there are a few things for me which make using it very annoying like that for example when upcasting a integer type, even though it is not possible to have UB you have to explicitly cast it, which leads to a lot of casting around numbers which could also happen automatically. Another thing is lifetimes, lifetimes and the way they require to have types and functions writted is very unintuitive and seams to be more for readability then actual function. The compiler could infer them.
Another thing is async functions and their expectation regarding lifetimes, but that might be due to my limited knowledge of them and might not be a issue with the language or the implementation of async/await in rust.
I like C and i like C++, sometimes i feel rust’s safety features get more in my way then to assist me at writing better code. But overall Rust is a very capable tool and i understand everyone who loves it, is it going to steer me away from C++ though? probably not.